
Red velvet’s origins trace back to early 20th‑century Southern bakeries, where a hint of cocoa and a splash of beet juice gave cakes their signature hue. Over time the recipe evolved, finding a new home in breakfast tables as a whimsical twist on classic waffles. This gluten‑free version honors that tradition while catering to modern dietary needs, balancing the deep color with a tender crumb. The journey from cake to waffle shows how culinary creativity can turn a simple comfort food into a celebrated brunch staple.
Why You'll Love It
-
- Naturally gluten‑free, no compromise on texture
-
- Vibrant red hue that feels festive
-
- Light, airy interior with a crisp exterior
-
- Simple ingredients you probably already have
"These waffles are like a soft hug on a plate – the color, the flavor, everything is just perfect!"
Essential Ingredient Guide
- Almond flour: Provides a moist crumb and subtle nutty background; sift for best texture.
- Cocoa powder: Adds depth to the chocolate flavor without darkening the color too much.
- Beet powder: Gives the signature ruby shade; a little goes a long way.
- Vanilla extract: Enhances the sweet aroma; use pure extract for the cleanest taste.
- Buttermilk (or dairy‑free alternative): Creates tender bubbles; the acidity helps the batter rise.
- Maple syrup: A natural sweetener that complements the chocolate notes.
Complete Cooking Process
-
Ingredient Readiness:
Measure flour, cocoa, and beet powder, then whisk together; this ensures even color and avoids lumps.
-
Flavor Development:
Mix wet ingredients separately; the acid in buttermilk reacts with the baking powder for a light rise.
-
Texture Control:
Fold the wet into the dry just until combined; over‑mixing can make the waffles dense.
-
Finishing Touches:
Add a splash of melted butter to the batter for extra crispness on the waffle surface.
-
Serving Timing:
Serve immediately while the edges are still crisp and the interior stays warm.
-
Pre‑heat the waffle iron fully; a hot iron gives that perfect snap.
-
Don’t over‑fill the iron – the batter expands and can spill.
-
Brush the iron with a thin layer of oil between batches for even browning.
-
Let cooked waffles rest a minute on a wire rack to stay crunchy.
Pro Tips
Well, those little adjustments make a world of difference. I’ve found that a brief rest allows the steam to escape, preserving that delightful crunch. So, take your time, enjoy the process, and let the aromas fill the kitchen before you dive in.
 Quick
Quick
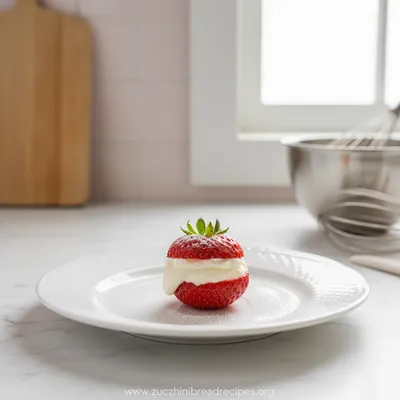
Cheesecake Stuffed Strawberries – Quick Party Snack
Bite‑size strawberries filled with a buttery cheesecake mousse, perfect for quick parties.
The essence of the dish:
A soft, velvety interior contrasted by a golden‑brown crust; the subtle earthy cocoa mingles with a sweet maple finish.
A fun fact or historical angle:
The original red velvet cake was a staple at Southern gatherings, prized for its striking color during the era of limited food coloring.
Flavor or sensory focus:
Expect a gentle cocoa richness, a whisper of vanilla, and just enough sweetness to brighten the palate.
You Must Know
-
Use fresh beet powder for vivid color.
-
Almond flour keeps it gluten‑free and moist.
-
Don’t over‑mix; keep batter slightly lumpy.
Frequently Asked Questions
→ Can I use regular flour?
You could, but the gluten‑free texture would change; almond flour gives the light crumb we aim for.
→ How do I store leftovers?
Cool completely, then place in an airtight container; reheat in a toaster or skillet.
→ Is beet powder necessary?
It creates the classic red hue; you can omit it for a chocolate‑only waffle, though the color will differ.
→ Can I make this dairy‑free?
Yes, swap buttermilk for almond milk plus a teaspoon of lemon juice.
→ What topping works best?
A dollop of whipped coconut cream and fresh berries adds brightness.
→ Will the batter sit?
Let it rest 5 minutes; the gluten‑free flours hydrate fully for better texture.
Nutrition Facts
per serving
280
Calories
8g
Protein
20g
Carbs
18g
Fat
Taste Profile
Chocolate‑sweet with a gentle earthiness
Ingredient Substitutions
Don't have an ingredient? Try these alternatives
Coconut flour absorbs more moisture; adjust liquid accordingly.
Honey adds a slight floral note; use the same amount.
Recipe Variations
Try these delicious twists on the original
Spicy Version
Add a pinch of cayenne and a drizzle of chocolate‑chili sauce for a subtle heat.
Mediterranean Style
Top with feta crumbles, sliced olives, and a sprinkle of za’atar for a savory twist.
Common Mistakes to Avoid
Learn from others' mistakes for perfect results
- Over‑mixing the batter, leading to dense waffles.
- Using a cold waffle iron, resulting in soggy edges.
- Adding too much liquid, which prevents crispness.
Meal Prep & Storage
Make Ahead Tips
You can whisk the dry ingredients together and store in an airtight container for up to one week; combine with wet ingredients when ready to cook.
Leftover Ideas
Reheat gently in a skillet with a drizzle of butter, or pop in a toaster oven for a quick crisp.
Perfect Pairings
Serve this with...
Cooking Timeline
Sift and combine dry ingredients; whisk eggs.
Mix wet ingredients; combine with dry mixture gently.
Cook waffles in pre‑heated iron, 4‑5 minutes each.
Plate waffles, add toppings, and serve immediately.
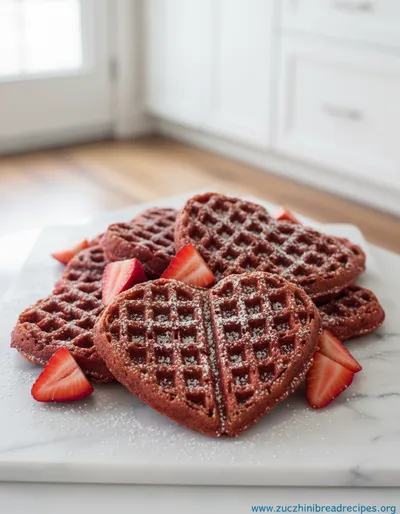
Gluten Free Red Velvet Waffles
Fluffy gluten free red velvet waffles, crisp on the outside and sweetly chocolatey inside. Perfect for a cozy brunch that feels both indulgent and comforting.
Timing
Prep Time
15 Minutes
Cook Time
12 Minutes
Total Time
27 Minutes
Recipe Details
Ingredients
Batter
-
01
1 1/2 cups almond flour
-
02
2 tbsp cocoa powder
-
03
1 tsp beet powder
-
04
2 tsp baking powder
-
05
1/4 tsp salt
-
06
2 large eggs
-
07
1/2 cup dairy‑free buttermilk
-
08
1/4 cup maple syrup
-
09
1 tsp vanilla extract
-
10
3 tbsp melted butter (or coconut oil)
Instructions
In a large bowl whisk together almond flour, cocoa powder, beet powder, baking powder, and salt; this dry mix creates an even color.
In another bowl beat the eggs, then stir in buttermilk, maple syrup, vanilla, and melted butter until smooth.
Pour the wet ingredients into the dry, folding gently until just combined; a few streaks are okay.
Pre‑heat your waffle iron, brush lightly with oil, and cook each waffle about 4‑5 minutes until crisp and deep ruby.
Serve immediately, topped with fresh berries, a drizzle of extra maple syrup, and a dollop of whipped coconut cream.
Notes & Tips
-
1
If the batter feels too thick, add a splash of almond milk.
-
2
For extra fluffiness, separate the eggs and fold in whipped egg whites.
-
3
Beet powder can stain; wear an apron and use silicone spatulas.
 Healthy
Baked Teriyaki Salmon – Easy Healthy Dinner
A quick baked salmon glazed with sweet‑savory teriyaki, perfect for a wholesome dinner.
Tools You'll Need
-
Waffle iron
-
Mixing bowls
-
Whisk
-
Spatula
-
Measuring cups and spoons
Must-Know Tips
-
Don’t over‑mix the batter; it keeps the waffles airy.
-
Pre‑heat the iron fully for a crisp edge.
-
Let cooked waffles rest on a wire rack to stay crunchy.
Professional Secrets
-
Room temperature ingredients ensure even cooking.
-
A hot waffle iron creates the perfect crust.
-
Lightly oil the iron after each batch to capture flavor.

Recipe by
Chloe Bennett🍫💖 Chocolate addict, dessert dreamer, and muffin magician. Sprinkles happiness in every bite 🎉🧁.
Get Delicious Recipes Weekly
Join 25,000+ home cooks getting our best recipes straight to their inbox.
Free forever • No spam • Unsubscribe anytime