
The concept of adding vegetables to bread dough dates back to times when home cooks needed to stretch their flour supplies and add nutrition to simple meals. Zucchini, with its mild flavor and high moisture content, became a popular addition to baked goods during the summer harvest season. These breadsticks carry on that tradition of resourceful cooking, transforming humble ingredients into something truly delightful.
Why You'll Love It
-
- They're packed with hidden vegetables, making them a sneaky healthy option
-
- The texture is wonderfully soft with just the right amount of chew
-
- They come together quickly with minimal prep work required
-
- The herby garlic flavor makes them irresistible straight from the oven
"My kids actually ask for these instead of regular breadsticks now. They're that good!"
Essential Ingredient Guide
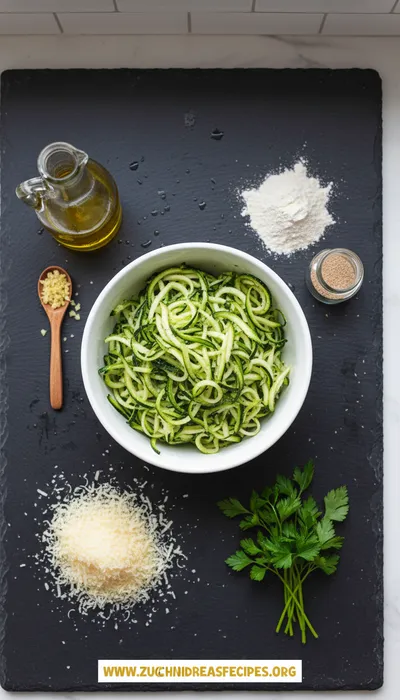
- Zucchini: Fresh, medium-sized zucchini works best. Grate it finely and make sure to squeeze out as much moisture as possible - this prevents the dough from becoming too wet.
- All-purpose flour: Provides the structure for the breadsticks. You can substitute up to half with whole wheat flour for more fiber if you like.
- Garlic powder: Adds that classic breadstick flavor without the fuss of fresh garlic. It distributes evenly throughout the dough.
- Italian seasoning: A blend that typically includes oregano, basil, thyme, and rosemary. It gives the breadsticks their characteristic herby aroma.
- Olive oil: Helps create a tender crumb and adds flavor. Brushing more on top before baking gives that golden, slightly crisp exterior.
- Parmesan cheese: Optional but recommended for that savory, umami kick. It melts into the dough and creates little flavor pockets.
Complete Cooking Process
-
Ingredient Readiness:
The key here is preparing your zucchini properly. Grate it, then take the time to really squeeze out the moisture using a clean kitchen towel. This step makes all the difference between perfect breadsticks and soggy ones.
-
Flavor Development:
The garlic powder and Italian seasoning bloom in the warm oven, releasing their aromas and infusing the entire breadstick with flavor as they bake.
-
Texture Control:
Kneading the dough just until it comes together ensures tenderness. Overworking it would make the breadsticks tough instead of soft.
-
Finishing Touches:
That final brush of olive oil and sprinkle of salt right before baking gives the tops that beautiful golden color and slight crispness.
-
Serving Timing:
These are best served warm from the oven when the exterior is slightly crisp and the interior is pillowy soft.
-
Don't skip squeezing the zucchini - it's the secret to perfect texture
-
Let the dough rest for 10 minutes after mixing for easier shaping
-
Use a pizza cutter to quickly slice the dough into even strips
-
Brush with olive oil generously for that bakery-style sheen
Pro Tips
I've made these breadsticks so many times now that I can practically do it with my eyes closed. The rhythm of grating, squeezing, mixing - it's become a comfortable routine. The kitchen fills with that warm, herby smell that just feels like home.
Honestly, the first time I made these, I was a bit worried they'd be too wet or wouldn't hold their shape. But they turned out beautifully, and now they're a regular in my rotation. They're especially good with a simple pasta dinner or alongside roasted vegetables.
 Quick
Quick
Cheesecake Stuffed Strawberries – Quick Party Snack
Bite‑size strawberries filled with a buttery cheesecake mousse, perfect for quick parties.
The essence of the dish:
What makes these breadsticks special is how they transform ordinary zucchini into something unexpectedly delightful. The vegetable disappears into the dough, leaving behind moisture and subtle sweetness that makes the breadsticks incredibly tender.
A fun fact or historical angle:
Adding vegetables to bread dough became popular during World War II as a way to stretch rationed flour supplies. Cooks discovered that vegetables like zucchini added both nutrition and moisture to their baked goods.
Flavor or sensory focus:
When you bite into these warm from the oven, you'll notice the slight crispness of the golden exterior giving way to a soft, herby interior. The aroma of garlic and Italian herbs fills the kitchen in the best way.
You Must Know
-
Squeezing the zucchini dry is non-negotiable for success
-
The dough will be slightly sticky - that's normal and correct
-
Bake until golden brown for the best texture and flavor
-
Let them cool slightly before serving for easier handling
Frequently Asked Questions
→ Can I use frozen zucchini?
Yes, but thaw it completely and squeeze out even more moisture than you would with fresh. Frozen zucchini tends to release more water as it thaws.
→ Why did my breadsticks turn out soggy?
This usually happens when the zucchini isn't squeezed enough. Really take the time to remove as much liquid as possible - it makes all the difference.
→ Can I make these gluten-free?
Absolutely! Use your favorite gluten-free flour blend. You might need to adjust the liquid slightly as gluten-free flours absorb differently.
→ How do I store leftovers?
Store in an airtight container at room temperature for up to 2 days. They reheat well in a 350°F oven for 5-7 minutes.
→ Can I add other vegetables?
Sure! Grated carrot or finely chopped spinach would work well. Just make sure to adjust for moisture content.
→ What's the best way to serve these?
Warm from the oven with marinara sauce for dipping, or alongside zucchini fritters for a complete meal.
Nutrition Facts
per serving
145
Calories
3g
Protein
17g
Carbs
7g
Fat
Taste Profile
Savory and herby with subtle vegetable sweetness
Ingredient Substitutions
Don't have an ingredient? Try these alternatives
Adjust liquid slightly as different flours absorb differently
Nutritional yeast adds cheesy flavor for dairy-free option
Use about 1/2 teaspoon each of your preferred herbs
Recipe Variations
Try these delicious twists on the original
Cheesy Garlic Version
Add extra garlic powder and mix in 1/2 cup shredded mozzarella with the dough
Herb Garden Style
Use fresh herbs like chopped rosemary, thyme, and oregano instead of Italian seasoning
Everything Bagel Style
Sprinkle with everything bagel seasoning before baking for extra flavor
Common Mistakes to Avoid
Learn from others' mistakes for perfect results
- Not squeezing zucchini enough leading to wet dough
- Overmixing the dough making breadsticks tough
- Baking at wrong temperature affecting rise and color
- Cutting strips unevenly causing uneven baking
Meal Prep & Storage
Make Ahead Tips
You can prepare the dough up to 4 hours ahead and refrigerate it. Let it come to room temperature for 30 minutes before shaping and baking.
Leftover Ideas
Reheat leftovers in a 350°F oven for 5-7 minutes to restore crispness. They also make great croutons for salads when cubed and toasted.
Perfect Pairings
Serve this with...
Cooking Timeline
Preheat oven, grate zucchini, and squeeze out moisture
Mix dry ingredients, combine with zucchini and wet ingredients
Shape dough on baking sheet, cut into strips
Brush with oil, sprinkle seasonings, bake until golden
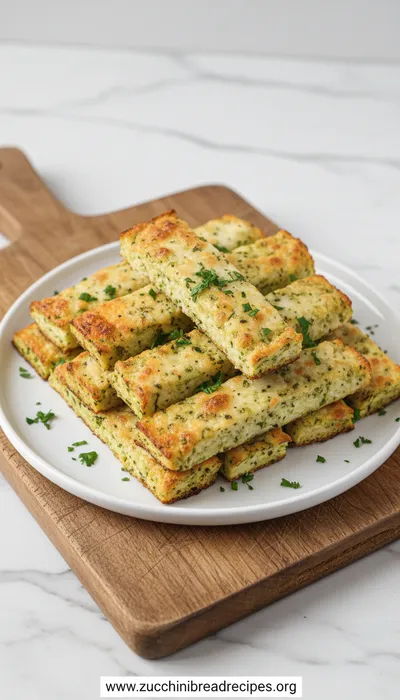
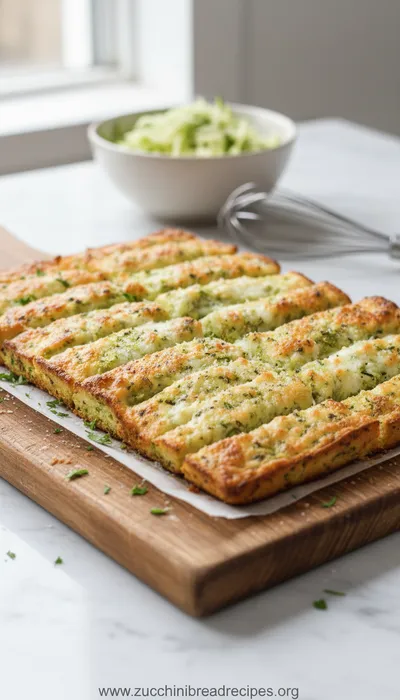
Cool slightly, garnish with parsley, and serve warm
Easy Zucchini Breadsticks Recipe for Beginners
These zucchini breadsticks are a revelation - soft, herby, and packed with fresh zucchini. They come together in about 30 minutes and are perfect for dipping in marinara sauce or enjoying alongside a simple weeknight dinner. Honestly, they're so good warm from the oven.
Timing
Prep Time
15 Minutes
Cook Time
15 Minutes
Total Time
30 Minutes
Recipe Details
Ingredients
Breadstick Dough
-
01
2 cups finely grated zucchini (about 2 medium zucchinis)
-
02
2 cups all-purpose flour
-
03
2 teaspoons baking powder
-
04
1 teaspoon garlic powder
-
05
1 teaspoon Italian seasoning
-
06
1 teaspoon salt
-
07
1/4 cup olive oil
-
08
1/4 cup grated Parmesan cheese (optional)
-
09
1/4 cup warm water (adjust as needed)
For Topping
-
01
2 tablespoons olive oil
-
02
1/2 teaspoon garlic powder
-
03
1/4 teaspoon salt
-
04
1 tablespoon fresh parsley, chopped
Instructions
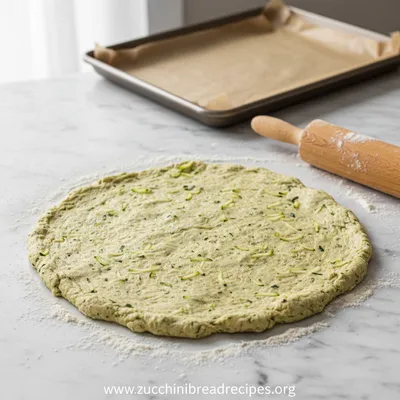
Preheat your oven to 400°F (200°C). Line a baking sheet with parchment paper. Grate the zucchini using the fine side of your grater - you should have about 2 cups packed.
Place the grated zucchini in a clean kitchen towel and squeeze firmly to remove as much moisture as possible. This is the most important step - really wring it out well.
In a large bowl, whisk together the flour, baking powder, garlic powder, Italian seasoning, and salt. Add the squeezed zucchini, olive oil, and Parmesan if using.
Gradually add warm water, mixing until a soft dough forms. It will be slightly sticky - that's normal. Knead gently in the bowl for about 30 seconds until it comes together.
Transfer the dough to your prepared baking sheet. Using lightly oiled hands, press and shape the dough into a rectangle about 1/2-inch thick.
Use a pizza cutter or sharp knife to slice the dough into 1-inch wide strips. Brush generously with the 2 tablespoons of olive oil and sprinkle with the additional garlic powder and salt.
Bake for 12-15 minutes, or until golden brown and cooked through. Sprinkle with fresh parsley and let cool for 5 minutes before serving.
Notes & Tips
-
1
Squeezing the zucchini thoroughly is crucial - don't rush this step
-
2
The dough should be soft and slightly sticky - add a bit more flour if it's unmanageable
-
3
These are best served warm but also make great leftovers for up to 2 days
-
4
For extra crispness, bake for an additional 2-3 minutes
 Healthy
Baked Teriyaki Salmon – Easy Healthy Dinner
A quick baked salmon glazed with sweet‑savory teriyaki, perfect for a wholesome dinner.
Tools You'll Need
-
Box grater
-
Clean kitchen towel
-
Large mixing bowl
-
Baking sheet
-
Parchment paper
-
Pizza cutter or sharp knife
-
Pastry brush
Must-Know Tips
-
Don't skip squeezing the zucchini - it prevents soggy breadsticks
-
Let the dough rest for 5-10 minutes for easier shaping
-
Brush generously with olive oil for that golden bakery finish
-
Use a pizza cutter for clean, even slices
Professional Secrets
-
Room temperature ingredients mix more evenly
-
High heat creates the perfect crisp exterior
-
Knead just until combined for tender texture
-
Resting the dough makes it easier to handle

Recipe by
Ava Brooks⏱️🥄 Busy baker, one-bowl expert, and mini-loaf maker. Fast recipes with maximum yum 😋🔥.
Get Delicious Recipes Weekly
Join 25,000+ home cooks getting our best recipes straight to their inbox.
Free forever • No spam • Unsubscribe anytime