
Originating from American diner culture, the bite‑size burger concept grew popular in the 1970s as fast‑food establishments experimented with snack‑friendly portions. Over time, home cooks adapted the idea, adding garlic and Parmesan for an extra layer of flavor, creating a bridge between classic comfort food and modern snack culture.
Why You'll Love It
-
- Ready in under 30 minutes, perfect for busy evenings
-
- No fancy equipment needed, just a skillet or oven
-
- Packed with garlic and Parmesan for an aromatic punch
-
- Juicy interior stays tender thanks to a simple meat‑ball mix
-
- Great for parties, game nights, or a quick snack
-
- Easy to freeze and reheat without losing flavor
"These bomb‑style bites are the perfect balance of savory and cheesy—my family can’t get enough!"
Essential Ingredient Guide
- Ground beef: Choose 80/20 lean‑to‑fat ratio for juicy bites; handle gently to keep texture tender
- Parmesan cheese: Freshly grated adds bright salty notes and a subtle nuttiness
- Garlic: Minced finely so its fragrance spreads evenly through each bite
- Cheddar cheese: Sharp cheddar melts into creamy pockets that pull the bite together
- Breadcrumbs: Lightly toast them first for a tender‑yet‑slightly crisp exterior
- Egg: Acts as a binder; room‑temperature egg helps keep the mixture cohesive
 Healthy
Energy Balls: Healthy Easy Snack Recipe
A calm, no‑bake snack that keeps you energized with wholesome nuts, dates, and a whisper of chocolate.
Complete Cooking Process
-
Ingredient Readiness:
Gather and measure all components, grate Parmesan, mince garlic, and bring the egg to room temperature.
-
Flavor Development:
Mix beef, garlic, cheese, breadcrumbs, and seasonings; let the blend rest for a few minutes so flavors meld.
-
Texture Control:
Form the mixture into bite‑size balls, then press a small well in each to hold a cheese core.
-
Finishing Touches:
Sear the bombs until golden, then finish in the oven for even cooking and melt the cheese inside.
-
Serving Timing:
Serve hot, straight from the oven, with a dipping sauce if desired.
-
Chill the meat mixture for 15 minutes before shaping; it makes the bombs hold together better
-
Use a hot skillet first to lock in juices, then finish in the oven for uniform cooking
-
Add a pinch of smoked paprika for a subtle depth without overwhelming the garlic
-
Serve with a simple aioli or ketchup to balance the richness
Pro Tips
I often find myself pausing while the bombs bake, letting the kitchen fill with that comforting garlic‑Parmesan scent. It’s a quiet moment—just the hum of the oven and the soft anticipation of the first bite. When they’re ready, the outer crust is lightly crisp while the interior stays tender, and that melted cheese core stretches just the right amount. It feels like a little celebration of simple, honest cooking.
The essence of the dish:
These bombs combine the heartiness of a beef patty with the bright, aromatic notes of garlic and Parmesan, creating a bite that’s both comforting and sophisticated.
A fun fact or historical angle:
Miniature burger bites first appeared in 1970s fast‑food menus as a way to offer snack‑size portions for on‑the‑go customers.
Flavor or sensory focus:
You’ll notice the first thing is the fragrant garlic, followed by the salty snap of Parmesan, then the juicy beef, and finally the creamy cheese melt.
You Must Know
-
Do not over‑mix the meat, it can become tough
-
Chill balls before cooking for shape retention
-
Cook on medium‑high heat to get a golden crust
-
Let rest a few minutes after baking to lock in juices
Frequently Asked Questions
→ Can I use turkey instead of beef?
Yes, ground turkey works well; just add a little extra fat or olive oil to keep the bombs moist.
→ How do I keep the cheese from leaking?
Make a small dent in the center of each ball, fill with cheese, then seal the edges before cooking.
→ Can I bake instead of pan‑fry?
Absolutely—pre‑heat the oven to 400°F, place bombs on a parchment sheet, and bake for 15‑18 minutes.
→ What dipping sauce goes best?
A simple garlic aioli or classic ketchup adds a nice contrast without overpowering the flavor.
→ How long can I store leftovers?
Refrigerate in an airtight container for up to 3 days; reheat in a skillet or oven to restore crispness.
→ Are these freezer‑friendly?
Yes—freeze raw bombs on a tray, then transfer to a zip‑top bag; bake from frozen, adding a few extra minutes.
Nutrition Facts
per serving
320
Calories
22g
Protein
8g
Carbs
22g
Fat
Taste Profile
Savory with a buttery, cheesy richness and a gentle garlic note.
Ingredient Substitutions
Don't have an ingredient? Try these alternatives
If using tofu, press and crumble it, then add a splash of soy sauce for flavor.
Provides a similar nutty profile; use the same amount.
Recipe Variations
Try these delicious twists on the original
Spicy Version
Add 1/4 tsp cayenne pepper to the meat mixture and finish with a drizzle of sriracha for a subtle kick.
Mediterranean Style
Incorporate crumbled feta, chopped Kalamata olives, and a pinch of oregano for a Mediterranean twist.
Common Mistakes to Avoid
Learn from others' mistakes for perfect results
- Over‑mixing the meat, which can make the bombs tough.
- Skipping the chill step, leading to misshapen bites.
- Cooking at too low heat, causing them to steam rather than sear.
Meal Prep & Storage
Make Ahead Tips
You can form the bombs and freeze them raw for up to 2 weeks; bake from frozen, adding 5 extra minutes.
Leftover Ideas
Reheat gently in a skillet over medium heat, covering briefly to warm through without drying out.
Perfect Pairings
Serve this with...
Cooking Timeline
Gather and prep all ingredients; grate cheese, mince garlic, beat egg.
Combine meat mixture, season, and chill briefly.
Form bombs, insert cheese core, and seal.
Sear bombs in skillet until golden on each side.
Transfer to oven, bake until interior reaches safe temperature, then rest.
 Quick
Quick
Cheesecake Stuffed Strawberries – Quick Party Snack
Bite‑size strawberries filled with a buttery cheesecake mousse, perfect for quick parties.

Garlic Parmesan Cheeseburger Bombs – Quick Recipe
These bite‑size garlic parmesan cheeseburger bombs are juicy, cheesy, and packed with flavor, offering a quick snack that feels like comfort food in miniature form.
Timing
Prep Time
15 Minutes
Cook Time
20 Minutes
Total Time
35 Minutes
Recipe Details
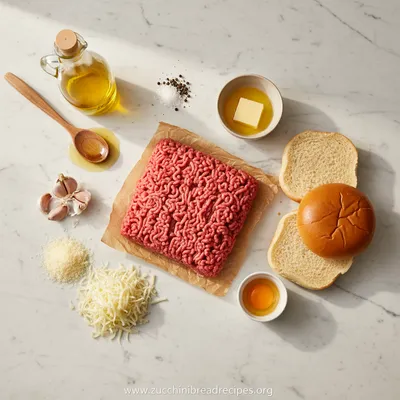
Ingredients
Main Ingredients
-
01
1 lb ground beef (80/20)
-
02
1/2 cup grated Parmesan cheese
-
03
1/2 cup shredded sharp Cheddar cheese
-
04
2 cloves garlic, minced
-
05
1 large egg, room temperature
-
06
1/3 cup breadcrumbs
-
07
1 tsp smoked paprika
-
08
1/2 tsp black pepper
-
09
1/2 tsp salt
-
10
2 tbsp olive oil (for pan‑frying)
Instructions
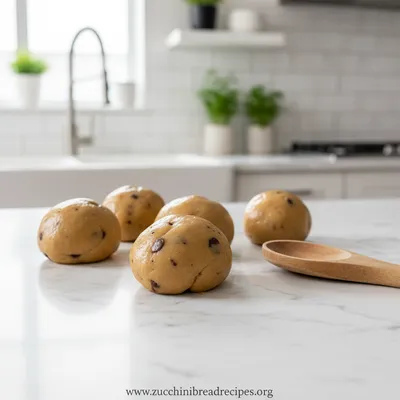
In a large bowl, combine ground beef, minced garlic, Parmesan, Cheddar, egg, breadcrumbs, smoked paprika, salt, and pepper; mix gently until just combined.
With damp hands, shape the mixture into 12 equal balls; press a small indentation in each and place a teaspoon of shredded Cheddar inside, then seal the opening.
Heat olive oil in a skillet over medium‑high heat; add the bombs and sear for 2‑3 minutes per side until golden brown.
Transfer the skillet to a pre‑heated oven at 400°F and bake for 10‑12 minutes, or until the interior reaches 160°F.
Remove from oven, let rest for 3 minutes, then serve hot with your favorite dipping sauce.
Notes & Tips
-
1
If the mixture feels too sticky, chill it for 10 minutes before shaping.
-
2
For extra crunch, sprinkle a light dusting of extra breadcrumbs on each bomb before baking.
-
3
Feel free to swap cheddar for pepper jack for a subtle heat kick.
 Healthy
High Protein Cookie Dough
Delicious, chocolatey cookie dough packed with protein for a healthy on‑the‑go treat.
Tools You'll Need
-
Large mixing bowl
-
Measuring cups and spoons
-
Skillet or sauté pan
-
Oven‑safe baking sheet
-
Parchment paper
-
Small spoon or melon baller (for cheese core)
Must-Know Tips
-
Don't over‑mix the meat; it can become dense and tough.
-
Let the bombs chill briefly; it helps them keep shape while cooking.
-
Taste the raw mixture and adjust salt or garlic before forming.
-
Use a hot pan first to lock in juices, then finish in the oven for even heat.
Professional Secrets
-
Room temperature ingredients ensure even cooking.
-
A quick sear develops a flavorful crust and traps moisture.
-
Baking after searing finishes the interior without drying out the meat.

Recipe by
Ava Brooks⏱️🥄 Busy baker, one-bowl expert, and mini-loaf maker. Fast recipes with maximum yum 😋🔥.
Get Delicious Recipes Weekly
Join 25,000+ home cooks getting our best recipes straight to their inbox.
Free forever • No spam • Unsubscribe anytime