
Chocolate has traveled across continents, from the ancient cacao beans of Mesoamerica to the modern confectionery tables of Europe. Its rich history brings together cultures, rituals, and celebrations, making it a timeless favorite for sweet creations. Layered desserts like these draw on the classic brownie foundation while introducing airy mousse to elevate texture and flavor without losing the cherished fudginess that chocolate lovers adore.
Why You'll Love It
-
- Two textures in one bite, fudgy and airy
-
- Simple steps, no special equipment needed
-
- Makes a stunning presentation for any occasion
-
- Perfect balance of sweet and bittersweet chocolate
"The mousse was so airy, and the brownie stayed perfectly fudgy—my guests could not stop raving!"
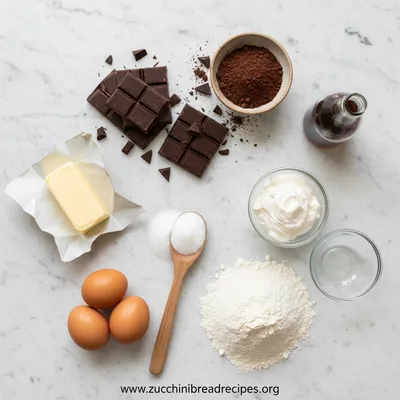
Essential Ingredient Guide
- Dark chocolate: Choose 70% cocoa for depth; melt gently to keep it glossy
- Heavy cream: Cold cream whips faster; it creates the silky mousse layer
- Unsalted butter: Provides richness in the brownie base and adds shine
- Eggs: Room‑temperature eggs incorporate air for a lighter crumb
- Granulated sugar: Balances bitterness; dissolve fully for smooth batter
- All‑purpose flour: Just enough to hold the brownies together without making them cakey
 Chocolate
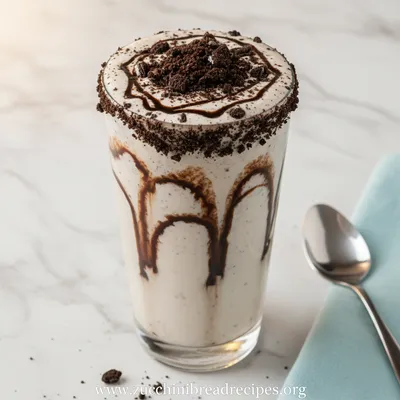
Creamy Oreo Smoothie
Indulge in a quick, chocolate‑kissed smoothie that’s both creamy and comforting.
Complete Cooking Process
-
Ingredient Readiness:
Measure and set out all components; melt chocolate and butter together, and chill the cream before whipping.
-
Flavor Development:
Blend melted chocolate with sugar and eggs, then stir in flour; the aroma deepens as you fold gently.
-
Texture Control:
Whip the chilled cream until soft peaks form, then fold into the cooled chocolate mixture for a light mousse.
-
Finishing Touches:
Spread brownie batter, bake until set, then pipe or spread the mousse on top while still warm.
-
Serving Timing:
Let the brownies cool completely, then chill for at least an hour so the mousse sets beautifully before slicing.
-
Use a silicone spatula to fold the mousse—prevents deflating the air.
-
Line the pan with parchment for easy removal.
-
Cool brownies on a wire rack before adding mousse to avoid melting.
-
Dust with a pinch of sea salt for contrast.
Pro Tips
Well, when you let the brownies sit a little longer, the mousse firms up and the flavors mingle—like an old friend visiting. I often find that a short rest lets the chocolate glaze become more glossy. It’s a small pause that makes the whole dessert feel more intentional, and it’s worth the extra five minutes.

The essence of the dish:
It’s the harmony of a dense, fudgy chocolate brownie base topped with a whipped chocolate mousse that feels almost like a cloud. The contrast of textures makes each bite an experience.
A fun fact or historical angle:
The brownie originated in the United States in the early 1900s, while chocolate mousse hails from France in the late 19th century—bringing two culinary traditions together.
Flavor or sensory focus:
You’ll notice the initial snap of the chocolate crust, followed by the silky melt of the mousse, and a lingering bittersweet finish that stays on the palate.
You Must Know
-
Do not over‑mix the batter; it stays tender.
-
Keep the mousse cold until serving.
-
Use quality chocolate for best flavor.
Frequently Asked Questions
→ Can I make this gluten‑free?
Yes, swap the all‑purpose flour for a 1‑to‑1 gluten‑free blend; the texture remains lovely.
→ How long can leftovers be stored?
Refrigerate in an airtight container for up to three days; the mousse stays firm.
→ Can I use milk chocolate instead of dark?
You can, but the mousse will be sweeter and less complex. Adjust sugar accordingly.
→ Do I need a special pan?
A 9‑inch square or an 8‑inch round pan works fine; just line it with parchment.
→ Is it possible to freeze them?
Yes, wrap individual squares tightly and freeze for up to two months; thaw in the fridge before serving.
→ What pairs well with these brownies?
A glass of cold milk, a scoop of vanilla ice cream, or a cup of strong black coffee complement the richness.
Nutrition Facts
per serving
420
Calories
6g
Protein
38g
Carbs
28g
Fat
Taste Profile
Rich chocolate with a soft, airy finish
Ingredient Substitutions
Don't have an ingredient? Try these alternatives
Will be sweeter; reduce powdered sugar in mousse.
Gives a nuttier crumb; may need a bit more moisture.
Recipe Variations
Try these delicious twists on the original
Spicy Version
Add 1/2 tsp cayenne pepper to the mousse for a subtle heat.
Mediterranean Style
Stir in 2 tbsp chopped pistachios and a sprinkle of orange zest into the mousse.
Common Mistakes to Avoid
Learn from others' mistakes for perfect results
- Over‑mixing the batter, which leads to a cakey texture.
- Adding the mousse while the brownies are still hot, causing it to melt.
- Using low‑quality chocolate, resulting in a flat flavor.
Meal Prep & Storage
Make Ahead Tips
You can bake the brownie base a day ahead, let it cool, then store covered. Prepare the mousse the night before and refrigerate; assemble just before serving.
Leftover Ideas
Reheat gently in a skillet over low heat, covered, to restore softness without melting the mousse.
Perfect Pairings
Serve this with...
Cooking Timeline
Preheat oven, line pan, and gather all ingredients.
Melt butter and chocolate, then whisk in sugar and eggs.
Fold in flour, spread batter, and place in oven.
While brownies bake, whip cream and fold in melted mousse chocolate.
Cool brownies, spread mousse, and refrigerate to set.
 Healthy
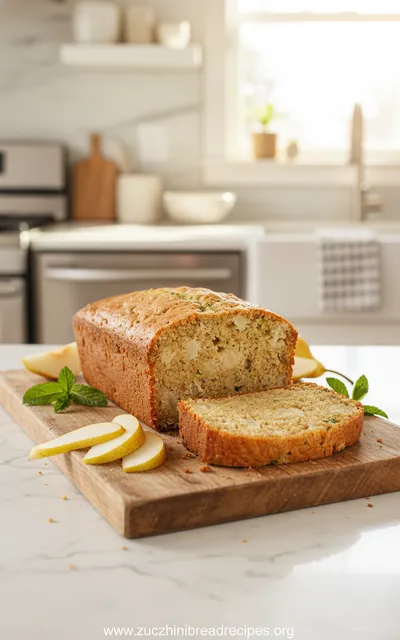
Pear Zucchini Bread Recipe
A moist and flavorful quick bread combining fresh pear and zucchini.
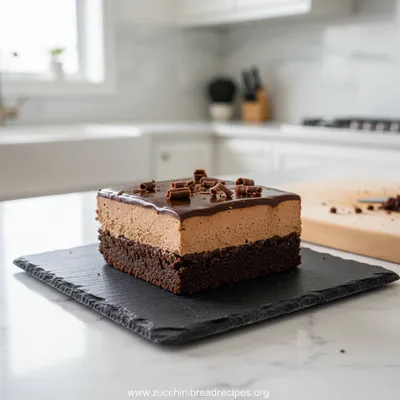
Layered Chocolate Mousse Brownies
Indulge in a dessert that feels like a quiet celebration—rich chocolate brownies with a cloud‑like mousse layered atop, perfect for sharing on a cozy evening or a romantic night in.
Timing
Prep Time
20 Minutes
Cook Time
25 Minutes
Total Time
45 Minutes
Recipe Details
Ingredients
Brownie Base
-
01
1/2 cup unsalted butter
-
02
8 oz dark chocolate, chopped
-
03
1 cup granulated sugar
-
04
2 large eggs
-
05
1 tsp vanilla extract
-
06
3/4 cup all‑purpose flour
-
07
1/4 tsp salt
Chocolate Mousse
-
01
1 cup heavy cream, chilled
-
02
4 oz dark chocolate, melted
-
03
2 tbsp powdered sugar
-
04
1 tsp vanilla extract
Instructions
Preheat the oven to 350°F (175°C). Line a 9‑inch square pan with parchment; set aside.
In a saucepan over low heat, melt butter and 8 oz dark chocolate together, stirring until smooth; remove from heat and let cool slightly.
Whisk sugar into the chocolate mixture, then add eggs one at a time, followed by vanilla; fold in flour and salt just until incorporated.
Spread the brownie batter evenly in the prepared pan and bake for 20‑22 minutes, until the surface looks set but a toothpick comes out with a few moist crumbs.
While brownies bake, whisk chilled cream, powdered sugar, and vanilla to soft peaks; gently fold in the melted 4 oz chocolate until smooth.
Allow brownies to cool in the pan for 10 minutes, then spread the chocolate mousse over the top, smoothing with a spatula.
Refrigerate for at least 1 hour before cutting into squares; dust with cocoa powder if desired.
Notes & Tips
-
1
If the mousse seems too runny, chill it for a few more minutes before spreading.
-
2
For an extra glossy top, you can drizzle a thin layer of melted chocolate just before chilling.
-
3
A pinch of sea salt sprinkled on the mousse adds a pleasant contrast.
 Classic
Best Banana Bread Recipe
Soft, sweet banana bread made with ripe bananas, a touch of butter, and simple pantry staples.
Tools You'll Need
-
9‑inch square baking pan
-
Parchment paper
-
Medium saucepan
-
Mixing bowls
-
Whisk
-
Spatula
-
Silicone pastry bag (optional for mousse)
Must-Know Tips
-
Don’t over‑mix the brownie batter; it keeps the crumb tender.
-
Whip the cream to soft peaks; over‑whipping makes the mousse grainy.
-
Cool the brownies slightly before adding mousse to prevent melting.
-
Use a sharp knife warmed under hot water for clean cuts.
Professional Secrets
-
Room‑temperature butter and chocolate melt evenly, preventing hot spots.
-
Baking the brownies just until set ensures a fudgy interior.
-
Folding the mousse gently preserves incorporated air for a light texture.

Recipe by
Chloe Bennett🍫💖 Chocolate addict, dessert dreamer, and muffin magician. Sprinkles happiness in every bite 🎉🧁.
Get Delicious Recipes Weekly
Join 25,000+ home cooks getting our best recipes straight to their inbox.
Free forever • No spam • Unsubscribe anytime