
I remember my grandmother's kitchen always had a jar of creamy peanut butter on the counter, right next to the bread box. Some of my fondest memories are of her handing me a thick slice of toast, still warm, with a generous smear of it. It was simple, perfect comfort. I wanted to capture that exact feeling with this zucchini bread. It started as a happy accident, honestly. I was making my usual loaf and spotted the peanut butter jar, and a little voice just whispered, 'why not?'. The first attempt was good, but it took a few tries to get that perfect, beautiful swirl and the right balance of nutty and sweet. Now, it's become a family favorite, a recipe that feels both new and deeply familiar, just like the baking inspiration I find on our homepage. It’s the kind of recipe that makes you want to slow down, put the kettle on, and just savor the moment.
Why You'll Adore This Bread
-
Deeply Comforting Flavor: The combination of rich, savory peanut butter and sweet, tender zucchini bread is just divine. It’s like your favorite childhood snack transformed into a beautiful, shareable loaf that feels both indulgent and wholesome all at once.
-
Unbelievably Moist Texture: Zucchini is the secret star here, lending an incredible amount of moisture that keeps the bread tender for days. Each bite is soft and cake-like, with a delicate crumb that practically melts in your mouth. You’ll be amazed at how lush the texture is.
-
So Simple to Make: This is one of those lovely, forgiving recipes that doesn't require any fancy equipment or techniques. It's a simple stir-and-bake quick bread that comes together in one bowl. It’s perfect for a lazy weekend baking session or for when you need a comforting treat without a lot of fuss.
-
The Perfect Use for Summer Zucchini: When the garden gives you more zucchini than you know what to do with, this recipe is your best friend. It beautifully incorporates those fresh green flecks, turning a humble vegetable into something truly special. It’s a delicious way to celebrate the season’s bounty.
This bread is pure nostalgia. The peanut butter swirl is just dreamy and it's so incredibly moist!
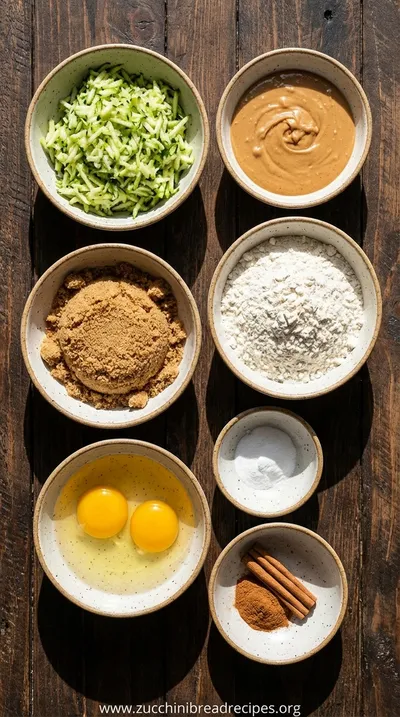
Essential Ingredient Guide
- Fresh Zucchini: The heart of the bread! You'll want to use a medium-sized zucchini, as the larger ones can be watery and have tougher seeds. There’s no need to peel it; those green flecks look so pretty and add a little extra texture. Just be sure to squeeze out the excess moisture after grating—this is the key to preventing a soggy loaf. That little bit of effort makes all the difference.
- Creamy Peanut Butter: For this recipe, I really prefer a classic, creamy peanut butter like Jif or Skippy. The natural, oil-on-top varieties can sometimes separate and make the swirl greasy. You want that smooth, emulsified texture to create those perfect, luscious ribbons throughout the bread. It’s what gives the loaf its signature look and that unmistakable nutty warmth.
- Light Brown Sugar: While you could use all white sugar, light brown sugar brings a soft, caramel-like sweetness that is just magical with peanut butter. It adds a deeper flavor profile and contributes to the bread's incredible moisture. The molasses in the brown sugar reacts beautifully in the batter, creating a wonderfully soft and tender crumb. It’s a small detail that adds so much warmth.
Complete Cooking Process
-
Preparation:
First, we create our calm little baking sanctuary. I love this part. Preheat your oven to 350°F (175°C) and find your favorite 9x5 inch loaf pan. Gently grease and flour it, or line it with parchment paper, leaving a little overhang on the sides to act as handles. This little trick makes lifting the finished loaf out so much easier. Then, take your zucchini and grate it using the large holes of a box grater. You'll want about one and a half cups. Place the grated zucchini in a clean kitchen towel or a few paper towels and give it a good squeeze over the sink. You’ll be surprised how much water comes out! This step is so crucial for a perfectly textured bread.
-
Mixing the Batter:
Now for the fun part, bringing everything together. In a large mixing bowl, I like to start by whisking the eggs until they're light and foamy. Then, pour in the vegetable oil, both sugars, and the vanilla extract, whisking until it’s all smooth and beautifully combined. Next, you’ll fold in the squeezed zucchini. In a separate bowl, whisk together your dry ingredients: the flour, baking soda, baking powder, salt, and cinnamon. Gently add the dry ingredients to the wet ingredients, mixing with a spatula just until you no longer see streaks of flour. Remember, the secret to a tender quick bread is not to overmix! A few little lumps are perfectly fine. If you love baking, you can find more amazing recipes on our site.
-
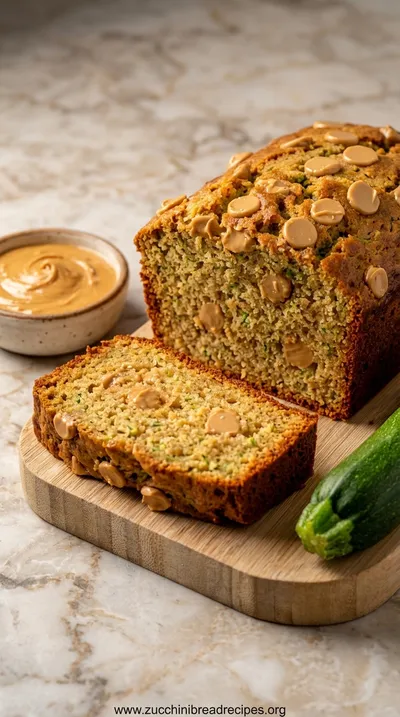
Creating the Swirl and Baking:
This is where the magic happens. Pour about half of the batter into your prepared loaf pan. Now, take your peanut butter and drop spoonfuls of it over the batter. Use a simple butter knife to gently swirl it through, just a few times back and forth. You don't want to fully mix it in; you want distinct ribbons of peanut butter. Top with the remaining batter, and repeat with a few more spoonfuls and swirls on top. Pop it into the preheated oven and let it bake for 50-60 minutes. The whole house will start to smell absolutely heavenly. You’ll know it’s done when a wooden skewer or toothpick inserted into the center comes out clean or with just a few moist crumbs attached.
-
Don't over-swirl the peanut butter. A few gentle passes with a knife is all you need to create those beautiful ribbons without muddying the batter.
-
Let the bread cool in the pan for about 15 minutes before using the parchment handles to lift it out. This helps it set and prevents it from breaking.
-
If the top of your bread starts browning too quickly, you can loosely tent it with a piece of aluminum foil for the last 15-20 minutes of baking.
Pro Tips
These little details really help ensure a perfect loaf every single time. Baking should feel gentle and rewarding, not stressful, so these tips are my gift to you.
 Classic
Orange Juice Cake – Moist, Citrus Delight
A moist orange juice cake that’s light, citrus‑perfumed, and perfect for any gathering.

Frequently Asked Questions
→ Can I use crunchy peanut butter instead of creamy?
You absolutely can! I love the little nutty bits that crunchy peanut butter adds. It will change the texture slightly, giving you little pockets of crunch within the soft bread, which can be a wonderful contrast. The swirl might not be as defined and smooth, but honestly, the flavor will still be fantastic. It's really a matter of personal preference, so feel free to experiment and see which one you like best.
→ How do I make this peanut butter zucchini bread gluten-free?
That's a great question! To make this gluten-free, you can substitute the all-purpose flour with a good quality 1-to-1 gluten-free baking flour blend that contains xanthan gum. I've had wonderful results with those blends. The texture will be slightly different, but still incredibly moist and delicious. For more detailed instructions, you might love our dedicated gluten-free zucchini bread recipe as a guide.
→ What's the best way to store the bread to keep it moist?
To keep this bread perfectly moist, let it cool completely on a wire rack first. This is so important, as wrapping it while warm can make it soggy. Once it's at room temperature, I like to wrap it tightly in plastic wrap or aluminum foil. It will stay wonderfully fresh on your counter for up to three days. If you need to store it longer, it keeps well in the refrigerator for about a week.
→ Can I freeze this bread?
Yes, this bread freezes beautifully! It's actually a wonderful thing to have stashed away for a busy day. Once the loaf has cooled completely, I recommend slicing it first. Then, you can wrap the individual slices or the entire loaf in plastic wrap, followed by a layer of aluminum foil or a freezer-safe bag. It will keep in the freezer for up to three months. Just pull out a slice and let it thaw on the counter or gently toast it.
→ My bread came out a bit dense. What did I do wrong?
Oh, that can happen sometimes, so don't worry! There are usually two common reasons for a dense quick bread. The first is overmixing the batter after adding the flour. You want to mix just until the dry ingredients are incorporated; a few lumps are okay. The second culprit is often too much moisture from the zucchini. It's really important to give the grated zucchini a good squeeze in a towel to get rid of that excess water before adding it to the batter.
→ Can I adapt this recipe to be dairy-free or vegan?
Yes, you can certainly make adaptations. For a dairy-free version, simply ensure you are using a vegetable oil and that your peanut butter doesn't contain any dairy. For a vegan loaf, you would need to replace the eggs with a vegan egg substitute, like a flax egg (1 tablespoon ground flaxseed mixed with 3 tablespoons water). You can find more tips in our dairy-free and vegan zucchini bread recipes.
→ Could I use a different nut butter, like almond or cashew butter?
Absolutely! Swapping out the peanut butter for almond or cashew butter would be a delicious variation. The flavor profile will change, of course, but the process remains the same. Almond butter would give it a more subtle, delicate nuttiness that is just lovely. If you're interested in baking with alternative flours and butters, you might enjoy our almond flour zucchini bread for inspiration.
Nutrition Facts
per serving
280
Calories
6g
Protein
32g
Carbs
15g
Fat
Taste Profile
A comforting balance of nutty, savory peanut butter and gentle, brown sugar sweetness.
Ingredient Substitutions
Don't have an ingredient? Try these alternatives
For a different flavor, melted coconut oil works beautifully. For a lower-fat option, you can substitute up to half of the oil with unsweetened applesauce, though the texture may be slightly denser.
For a heartier, nuttier loaf, try using half whole wheat flour. It will make the bread a bit denser but adds a lovely rustic quality. If you're looking for a low-carb option, consider our keto zucchini bread recipe.
Recipe Variations
Try these delicious twists on the original
Peanut Butter & Chocolate Chip
A classic pairing! Fold 3/4 cup of semi-sweet chocolate chips into the batter before pouring it into the pan. The melted chocolate with the peanut butter swirl is absolutely heavenly.
Add Some Crunch
For extra texture, add 1/2 cup of chopped roasted peanuts or walnuts to the batter. You can also sprinkle some on top before baking for a crunchy, beautiful finish.
Common Mistakes to Avoid
Learn from others' mistakes for perfect results
- Forgetting to squeeze the zucchini, which results in a dense, soggy loaf.
- Overmixing the batter, which develops gluten and makes the bread tough.
- Over-swirling the peanut butter, which mixes it in completely instead of creating distinct ribbons.
- Slicing the bread while it's still warm, causing it to crumble and fall apart.
Meal Prep & Storage
Make Ahead Tips
You can absolutely prep some components ahead of time to make baking day even easier. The dry ingredients can be whisked together and stored in an airtight container at room temperature for weeks. You can also grate the zucchini a day in advance; just store it in an airtight container in the fridge and be sure to squeeze it very well right before you mix the batter, as it will have released more water overnight.
Leftover Ideas
Leftover slices are a true gift! They are fantastic gently warmed in a toaster oven or microwave for a quick breakfast. For a really special treat, use thicker slices to make French toast! Just dip them in an egg batter and pan-fry until golden. You can also crumble leftover bread over yogurt or ice cream for a delicious, textured topping.
Perfect Pairings
Serve this with...
Cooking Timeline
Preheat oven, prepare the loaf pan, and whisk together dry ingredients.
Grate and squeeze the zucchini. Whisk together the wet ingredients.
Combine wet and dry ingredients, being careful not to overmix. Fold in the zucchini.
Layer the batter and peanut butter in the pan, creating the swirl.
Bake for 50-60 minutes, until a toothpick comes out clean. Let it cool.

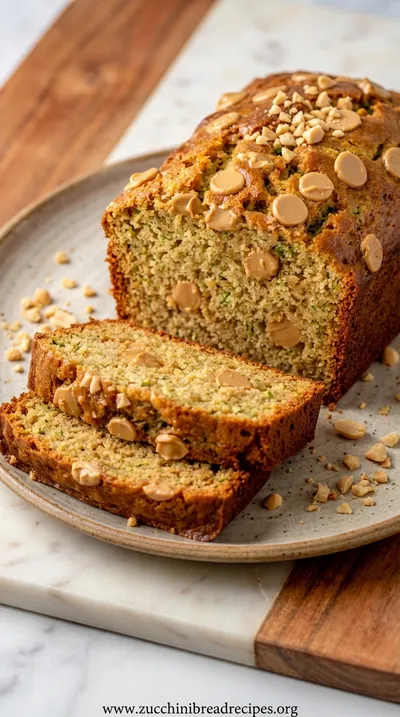
Traditional Peanut Butter Zucchini Bread Recipe
Make delicious traditional peanut butter zucchini bread with this easy recipe. Perfect for using summer zucchini with rich peanut butter flavor.
Timing
Prep Time
20 Minutes
Cook Time
55 Minutes
Total Time
1 Hour 15 Minutes
Recipe Details
Ingredients
Zucchini Bread Batter
-
01
1 1/2 cups all-purpose flour
-
02
1/2 teaspoon baking soda
-
03
1/2 teaspoon baking powder
-
04
1/2 teaspoon salt
-
05
1 teaspoon ground cinnamon
-
06
2 large eggs
-
07
1/2 cup vegetable oil
-
08
1/2 cup granulated sugar
-
09
1/2 cup packed light brown sugar
-
10
1 teaspoon vanilla extract
-
11
1 1/2 cups grated fresh zucchini, squeezed dry
For the Peanut Butter Swirl
-
01
1/2 cup creamy peanut butter
Instructions
First, let's get our space ready. It always feels better to bake in a calm, organized kitchen, don't you think? Go ahead and preheat your oven to a cozy 350°F (175°C). Find your trusty 9x5 inch loaf pan and prepare it by greasing and flouring it, or my favorite method, lining it with parchment paper so you can lift the bread out easily later. In a medium bowl, whisk together the flour, baking soda, baking powder, salt, and that lovely, warm cinnamon. Just setting these dry ingredients aside makes the whole process feel so much smoother.
Now, in a larger bowl, it's time for the wet ingredients. Crack your eggs and give them a good whisk until they're a little frothy. Then, pour in the oil, both the white and brown sugars, and the vanilla extract. Whisk it all together until it's smooth and the sugars have started to dissolve. There's something so satisfying about this step. Next, you'll add your grated and squeezed zucchini. Use a spatula to gently fold it in. Look at those beautiful green flecks suspended in the batter—it’s already starting to feel special.
Let's bring it all together. Gently pour the dry ingredient mixture into the wet ingredients. Using your spatula, fold everything together with slow, deliberate strokes. You want to mix just until you don't see any more dry flour. A few lumps here and there are perfectly fine and are the sign of a tender bread to come. Overmixing develops the gluten and can make the bread tough, and we want a soft, delicate crumb. The batter should look thick and wonderfully textured.
This is my favorite part—the swirl! Pour about half of your batter into the prepared loaf pan and spread it evenly. Now, take your creamy peanut butter and drop spoonfuls over the surface. Using a butter knife, gently drag it through the batter a few times to create a marbled effect. Don't go crazy here; less is more for a beautiful swirl. Top with the remaining batter, spread it out, and then add a few more dollops and swirls of peanut butter on top for a lovely finish. Bake for 50 to 60 minutes. When a toothpick inserted into the center comes out clean, it's ready. Let it cool in the pan for 15 minutes before transferring it to a wire rack to cool completely. The wait is the hardest part, I know!
Notes & Tips
-
1
Squeezing the zucchini is non-negotiable! It seems like a small step, but it's the most important one for achieving a light, moist crumb instead of a heavy, waterlogged loaf. I just use a clean tea towel to wring out all that extra liquid.
-
2
Room temperature eggs will incorporate more easily and create a more uniform batter. If you forget to take them out ahead of time, you can place them in a bowl of warm (not hot) water for about 5-10 minutes. It's a simple trick that helps create a lighter texture.
-
3
Please, please let the bread cool completely before slicing it. I know it's tempting to cut into it while it's warm, but it will be quite crumbly. Allowing it to cool fully lets the crumb set, giving you those perfect, clean slices. It’s worth the wait, I promise.
 Healthy
Pear Zucchini Bread Recipe
A moist and flavorful quick bread combining fresh pear and zucchini.
Tools You'll Need
-
9x5 Inch Loaf Pan: This is the classic home for any quick bread. A light-colored metal pan is my preference as it conducts heat evenly and helps prevent the outside from getting too dark before the inside is cooked through.
-
Box Grater: A simple box grater is all you need for the zucchini. I use the side with the larger holes, which creates perfect little shreds that melt into the bread while still providing that essential moisture and texture.
-
Mixing Bowls: Having a couple of different-sized mixing bowls makes the process feel so much more organized. One for the dry ingredients, one for the wet. It keeps your workspace tidy and the process feeling graceful and unhurried.
-
Silicone Spatula: A flexible silicone spatula is your best friend for folding the batter gently and for scraping every last bit out of the bowl. We don't want to waste any of that deliciousness, after all.
Must-Know Tips
-
Don't Overmix the Batter: This is the golden rule of quick breads. Mix only until the flour disappears to ensure a tender, soft texture. Overmixing can lead to a tough, dense loaf.
-
Check for Doneness Correctly: The toothpick test is reliable for a reason. Insert it into the very center of the loaf. If it comes out with wet batter, it needs more time. A few moist crumbs are perfect.
-
Cool Completely Before Storing: Wrapping a warm loaf creates condensation, which can make the crust soggy. Patience is key! Let it cool completely on a wire rack for the best texture.
Professional Secrets
-
A Touch of Cinnamon: The teaspoon of cinnamon in this recipe is a quiet supporting actor. It doesn't scream 'spice,' but it beautifully enhances the nutty warmth of the peanut butter and adds a layer of aromatic depth.
-
The Swirl Technique: For the prettiest swirl, warm your peanut butter in the microwave for just 10-15 seconds. This makes it slightly more fluid and easier to marble through the thick batter without overmixing.
-
Parchment Paper Sling: Lining the pan with parchment paper that hangs over the two long sides creates a 'sling.' This makes it incredibly easy to lift the entire loaf out of the hot pan without any risk of it breaking.

Recipe by
Maya Green🌱🥗 Healthy foodie, vegan baker, and smoothie lover. Sharing guilt-free treats with energy and love 💪💚.
Get Delicious Recipes Weekly
Join 25,000+ home cooks getting our best recipes straight to their inbox.
Free forever • No spam • Unsubscribe anytime