
Sugar cookies date back to the 1700s, when German settlers in Pennsylvania created the classic recipe that would become an American staple. The tradition of decorating cookies for special occasions evolved over centuries, with these football-themed versions becoming particularly popular during the rise of televised sports in the mid-20th century. The combination of sturdy construction for detailed decoration and sweet, comforting flavor made them perfect for game day gatherings where both children and adults could enjoy creating and eating these edible works of art.
Why You'll Love It
-
- The cookies hold their shape beautifully for detailed field decorations
-
- Sweet but not overly rich, perfect for snacking throughout the game
-
- Fun activity to do with kids or guests before kickoff
-
- Makes your dessert table instantly festive and thematic
"My kids beg me to make these every football season—they're the highlight of our game day snacks!" - Sarah, football mom of three
Essential Ingredient Guide
- Unsalted butter: Room temperature butter creams perfectly with the sugar, creating that tender crumb we love. I always take mine out about an hour before I start baking, letting it soften naturally on the counter.
- Granulated sugar: Regular white sugar gives these their signature crisp edges and sweet base. Don't be tempted to reduce it—the sugar helps the cookies hold their structure.
- All-purpose flour: The foundation of our cookies. I always fluff my flour before measuring—just dip the measuring cup in and level it off, no packing down.
- Green decorating sugar: This creates our football field! Look for the coarse kind that sparkles—it gives that realistic grass texture. Sometimes I find it in the baking aisle near the sprinkles.
- Pure vanilla extract: That warm, familiar scent that fills the kitchen. Real vanilla makes all the difference here—you can taste it in every bite.
- Royal icing: For the yard lines. It dries hard and crisp, perfect for holding its shape. I make mine with powdered sugar and egg whites—simple but effective.
 Quick
Quick
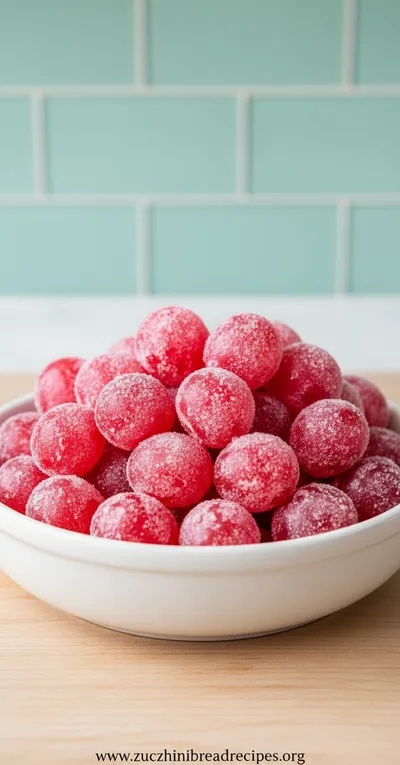
Kool-Aid Grapes Recipe
A quick, colorful snack of grapes soaked in Kool‑Aid for a sweet‑tart bite.
Complete Cooking Process
-
Ingredient Readiness:
Everything needs to be at room temperature, honestly. The butter should be soft enough that your finger leaves a gentle indent, but not melted. Eggs too—cold eggs can make the dough curdle. I set everything out on the counter while I have my morning coffee, and by the time the game pre-show starts, we're ready to bake.
-
Flavor Development:
Creaming the butter and sugar together—that's where the magic starts. You want it light and fluffy, almost white in color. That incorporates air and makes the cookies tender. I beat it for a good three, four minutes sometimes, just standing there watching it transform. Then the vanilla goes in, and the whole kitchen smells like childhood.
-
Texture Control:
When you add the flour, mix just until it disappears. Overmixing makes tough cookies. And chilling the dough—oh, that's important. Thirty minutes in the fridge firms up the butter again so the cookies don't spread too much in the oven. They keep their stadium shape better that way.
-
Finishing Touches:
The green sugar gets pressed in right before baking, and you want to do it firmly but gently. Then the icing lines go on after they're completely cool. I use a small ziplock bag with the corner snipped off—fancy piping tips aren't necessary for straight lines.
-
Serving Timing:
These are best the day they're made, but honestly, they keep well in an airtight container for a few days. I like to make them the morning of the game so they're fresh for halftime.
-
Chill the dough between batches if your kitchen is warm—warm dough spreads more
-
Use a light touch when pressing in the green sugar—too hard and it sinks in
-
Let cookies cool completely before icing—warm cookies make runny lines
-
Bake one test cookie first to check your oven temperature
Pro Tips
You know, I've made these cookies through so many seasons now. Through wins and losses, through kids growing up and moving out, through different kitchens in different houses. There's something steadying about the process—creaming butter and sugar, measuring flour, pressing that green sugar into the dough. It's a rhythm that stays the same even when everything else changes.
And the thing is, they always turn out. Even when I'm distracted by the game on TV, even when I'm rushing to get them done before kickoff. The recipe is forgiving that way. The cookies might spread a little more one time, or the lines might be a bit wobbly another, but they're always delicious. They always bring that same smile to people's faces when they see that little football field sitting there on the plate.
 Healthy
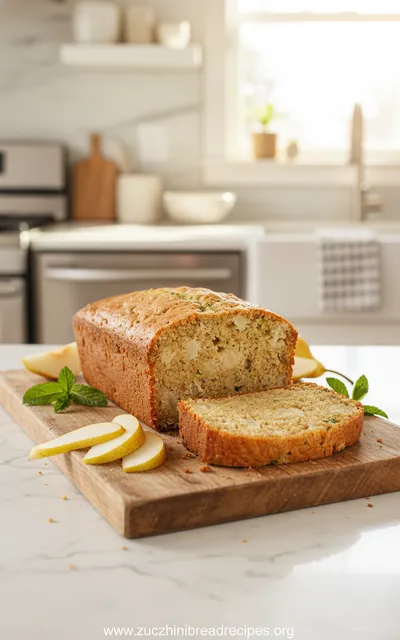
Pear Zucchini Bread Recipe
A moist and flavorful quick bread combining fresh pear and zucchini.
The essence of the dish:
What makes these special is how they bridge that gap between kid-friendly fun and sophisticated enough for adults. The cookie itself is classic—buttery, tender, that melt-in-your-mouth quality we all love in a good sugar cookie. But then you add that festive decoration, and suddenly it's not just a cookie anymore. It's part of the celebration, part of the ritual of game day. I mean, there's something about biting into one during a tense moment in the fourth quarter that just feels right, you know?
A fun fact or historical angle:
Sugar cookies actually originated with German settlers in Pennsylvania—they called them 'napoleons' originally. The tradition of decorating them for holidays and special occasions evolved over time, and with the rise of televised football in the 1960s, people started creating sports-themed versions. These football field cookies became particularly popular for Super Bowl parties in the 1980s.
Flavor or sensory focus:
When you bite into one, you get that initial crunch from the green sugar crystals, then the tender cookie gives way with that familiar butter-vanilla warmth. The white icing adds just a hint of sweetness without being overwhelming. It's the texture contrast that gets me every time—the crisp sugar, the soft cookie, the hard icing lines. They all play together so nicely.
You Must Know
-
Don't skip chilling the dough—it prevents excessive spreading
-
Use coarse green sugar, not sanding sugar, for the best field texture
-
Royal icing is essential for crisp lines that won't bleed
-
Bake until just golden at the edges for the perfect texture
Frequently Asked Questions
→ Can I make the dough ahead of time?
Absolutely. The dough keeps well wrapped in plastic in the refrigerator for up to 3 days, or you can freeze it for a month. Just let it thaw in the refrigerator overnight before rolling and baking.
→ My cookies spread too much—what went wrong?
Usually it's butter that was too soft, or the dough wasn't chilled long enough. Also check your oven temperature with a thermometer—if it runs cool, the cookies will spread before they set.
→ Can I use food coloring instead of green sugar?
You can, but the texture won't be the same. The sugar gives that grassy, crystalline look that really makes them look like a field. If you do use coloring, mix it with coarse sugar first for better results.
→ How far in advance can I decorate them?
The decorated cookies keep beautifully for 2-3 days in an airtight container. The icing holds up well as long as they're stored properly.
→ Can I make these gluten-free?
Yes, use a 1:1 gluten-free flour blend. The texture might be slightly different, but they'll still be delicious. I've had good results with Bob's Red Mill blend.
→ What if I don't have royal icing?
You can make a simple glaze with powdered sugar and milk, but it won't dry hard. For defined lines, royal icing is really worth making—it's just powdered sugar, egg whites, and a bit of cream of tartar.
Nutrition Facts
per serving
145
Calories
2g
Protein
21g
Carbs
6g
Fat
Taste Profile
Classic sweet sugar cookie flavor with buttery vanilla notes
Ingredient Substitutions
Don't have an ingredient? Try these alternatives
Texture may be slightly different but still delicious
Works equally well, may have slight molasses flavor
Recipe Variations
Try these delicious twists on the original
Chocolate Field Version
Add 1/4 cup cocoa powder to the dough and use white icing for contrast—perfect for night games or chocolate lovers
Mini Stadiums
Use a smaller cookie cutter for bite-sized versions—great for large parties or when you want to sample other desserts too
Common Mistakes to Avoid
Learn from others' mistakes for perfect results
- Skipping the chilling step causes cookies to spread too much
- Overbaking makes cookies hard instead of tender
- Adding icing to warm cookies causes it to melt and run
- Pressing sugar too hard makes it sink into the dough
Meal Prep & Storage
Make Ahead Tips
Dough can be made up to 3 days in advance and stored in the refrigerator, or frozen for a month. Baked cookies freeze well for up to 2 months—freeze before decorating, then ice after thawing.
Leftover Ideas
Store leftovers in an airtight container. They're still delicious for up to 5 days, though the icing may soften slightly. Great for lunchboxes or afternoon snacks throughout the week.
Perfect Pairings
Serve this with...
Cooking Timeline
Cream butter and sugar, mix dough, chill—perfect time during pre-game shows
Chilling time—great opportunity to set up snacks or watch game analysis
Roll, cut, and bake first batch—usually during first quarter
Bake remaining batches while first cookies cool
Decorate cooled cookies—perfect halftime activity
 Classic
Orange Chicken – Crispy Tangy Sauce
Crispy orange chicken with a glossy, sweet‑tangy sauce—quick, satisfying, and classic.
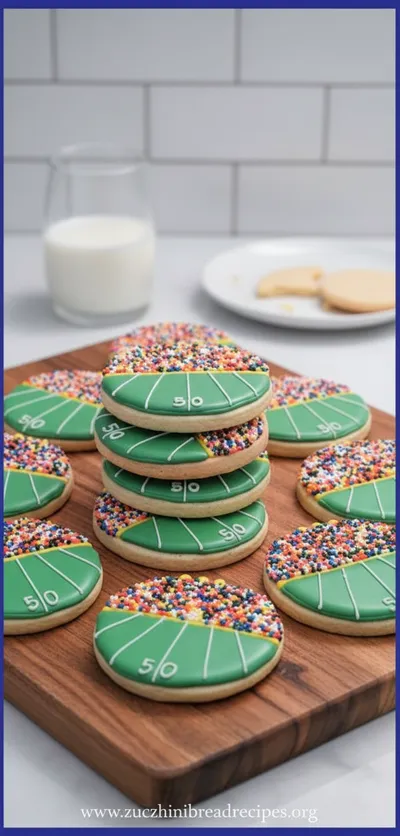
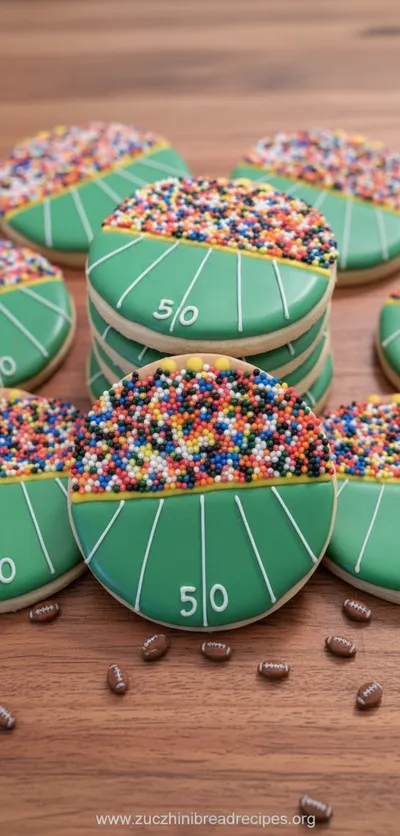
Football Stadium Sugar Cookies For Game Day
Honestly, these football stadium sugar cookies bring back such sweet memories of Sunday afternoons with my family, the scent of vanilla and butter filling our kitchen while the game played in the next room. They're sturdy enough to decorate yet melt-in-your-mouth tender, dotted with green sugar for the field and white icing lines that hold their shape perfectly.
Timing
Prep Time
30 Minutes
Cook Time
10 Minutes
Total Time
1 Hour 40 Minutes
Recipe Details
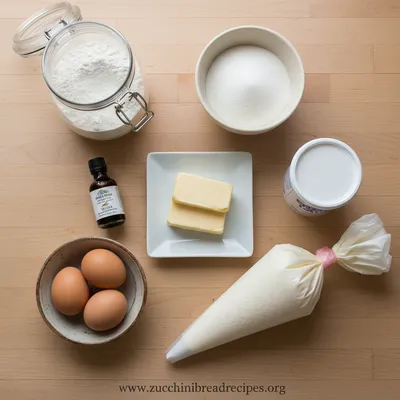
Ingredients
Cookie Dough
-
01
1 cup unsalted butter, room temperature
-
02
1 cup granulated sugar
-
03
1 large egg, room temperature
-
04
2 teaspoons pure vanilla extract
-
05
3 cups all-purpose flour
-
06
1/2 teaspoon baking powder
-
07
1/4 teaspoon salt
For Decorating
-
01
1/2 cup green decorating sugar
-
02
1 recipe royal icing (2 cups powdered sugar, 2 egg whites, 1/4 teaspoon cream of tartar)
Instructions
In a large bowl, cream together the softened butter and sugar until light and fluffy—this takes about 3-4 minutes with an electric mixer. Beat in the egg and vanilla until well combined. In another bowl, whisk together the flour, baking powder, and salt. Gradually add the dry ingredients to the butter mixture, mixing just until the flour disappears. The dough will be soft but manageable.
Divide the dough in half and shape each portion into a disk. Wrap in plastic wrap and refrigerate for at least 1 hour until firm. This chilling step is crucial—it prevents the cookies from spreading too much and helps them hold their shape. I sometimes make the dough the night before if I'm planning an early game.
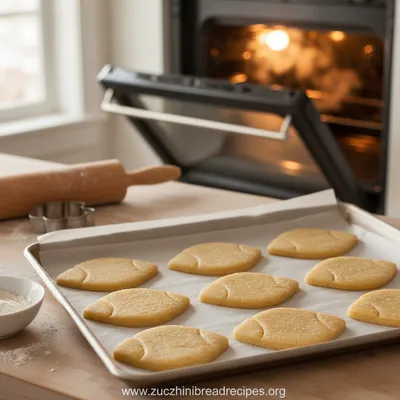
Preheat your oven to 350°F (175°C) and line baking sheets with parchment paper. On a lightly floured surface, roll one disk of dough to about 1/4-inch thickness. Use a rectangular cookie cutter (about 3x2 inches works well) to cut out your stadium shapes. Transfer to prepared baking sheets, leaving about 2 inches between cookies.
Sprinkle the green sugar generously over each cookie, pressing lightly to help it adhere. You want that grassy field look, so don't be shy with it. Bake for 8-10 minutes, until the edges are just starting to turn golden. The centers should still look soft—they'll firm up as they cool.
Let the cookies cool on the baking sheet for 5 minutes before transferring to a wire rack to cool completely. This patience pays off—rushing this step might cause breakage. While they cool, prepare your royal icing according to your favorite recipe.
Once cookies are completely cool, use a small piping bag or ziplock bag with the corner snipped off to pipe white yard lines across each cookie. Let the icing dry completely before storing or serving—this usually takes about an hour. And there you have it—your own miniature football field ready for game day!
Notes & Tips
-
1
Store decorated cookies in a single layer or with parchment between layers to protect the icing
-
2
Dough can be frozen for up to 3 months—thaw in refrigerator before using
-
3
For extra sparkle, mix green sugar with a bit of white sparkling sugar
-
4
If dough becomes too soft while rolling, rechill for 15-20 minutes
 Classic
Best Banana Bread Recipe
Soft, sweet banana bread made with ripe bananas, a touch of butter, and simple pantry staples.
Tools You'll Need
-
Electric mixer
-
Rolling pin
-
Rectangular cookie cutter
-
Parchment paper
-
Baking sheets
-
Wire cooling racks
-
Piping bag or ziplock bags
-
Measuring cups and spoons
Must-Know Tips
-
Room temperature ingredients blend more evenly for better texture
-
Don't overmix the dough after adding flour—just until combined
-
Rotate baking sheets halfway through for even browning
-
Let cookies cool completely before decorating to prevent icing melting
Professional Secrets
-
Chill dough between batches if kitchen is warm
-
Use an oven thermometer for accurate temperature
-
For perfect lines, practice icing on parchment first
-
A light flour dusting prevents sticking without altering taste

Recipe by
Emma Harper🥖✨ Lover of timeless recipes, cozy kitchens, and golden loaves. Always baking memories with love ❤️🍽️.
Get Delicious Recipes Weekly
Join 25,000+ home cooks getting our best recipes straight to their inbox.
Free forever • No spam • Unsubscribe anytime