
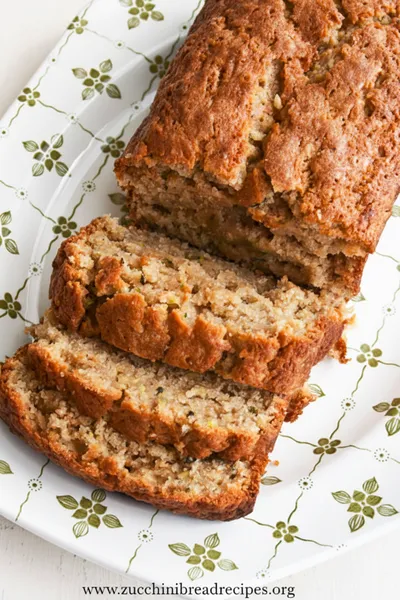
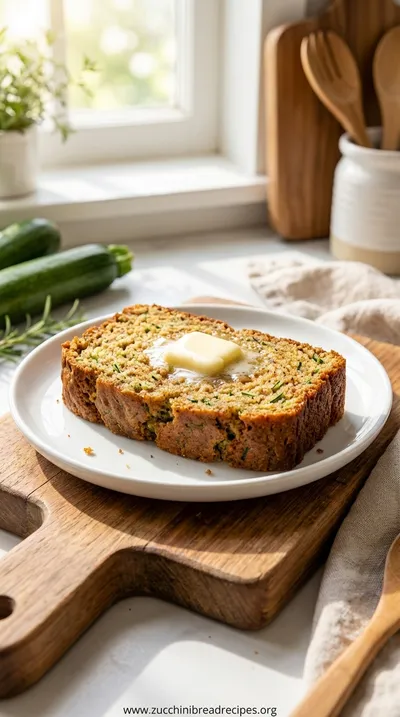
I remember when my sister first had to go gluten-free. It felt like her world of cozy baked goods had shrunk overnight. We tried so many recipes, and honestly, a lot of them were... well, disappointing. They were often dry, crumbly, or had a strange aftertaste. It became a little mission of mine to create a gluten-free zucchini bread that felt just as comforting and satisfying as the one my grandmother used to make. It took a while, a lot of flour blends, and a few oops moments in the kitchen, but when I finally pulled this loaf from the oven, I knew it was the one. The crumb was perfect, the moisture was locked in, and the flavor was just pure, simple nostalgia. Sharing that first warm slice with her, and seeing her face light up, was just everything. It’s more than a recipe; it’s a little piece of home.
Why You'll Adore This Bread
-
Impossibly Moist & Tender: Seriously, the texture is a dream. The zucchini and oil work together to create a beautifully soft crumb that stays fresh for days, which can be a real challenge in gluten-free baking.
-
Simple, Wholesome Ingredients: There's nothing complicated here. This recipe relies on straightforward ingredients you likely already have, especially if you have a garden overflowing with zucchini. It feels good to bake something so nourishing from scratch.
-
Warm, Comforting Spices: The combination of cinnamon and nutmeg is classic for a reason. It fills your home with the most incredible aroma as it bakes, making the whole house feel cozy and welcoming. It's the perfect scent for a slow weekend morning.
-
Wonderfully Forgiving: If you're new to gluten-free baking, this is the perfect recipe to start with. It’s not fussy at all. The process is simple, and the results are consistently delicious, building that confidence you need in the kitchen.
“This is the only gluten-free zucchini bread my family asks for again and again. So unbelievably moist and flavorful!”
Essential Ingredient Guide
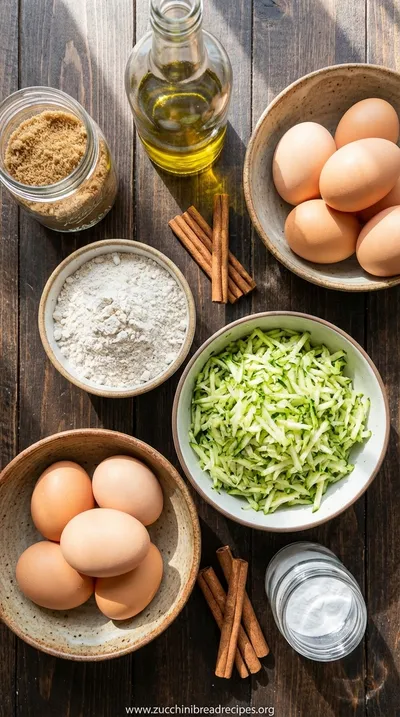
- Gluten-Free All-Purpose Flour: This is the star of the show, and the blend you choose really matters. I recommend using a high-quality blend that already contains xanthan gum. Xanthan gum is what helps mimic the structure and elasticity of gluten, so it's essential for preventing a crumbly loaf. Look for blends with a mix of rice flour, sorghum flour, and starches for the best texture.
- Fresh Zucchini: Ah, the garden's gift! You’ll want to use a box grater on the medium-sized holes for the perfect texture. The key is not to squeeze out all the water. I give it one gentle press between my palms to get rid of the excess, but you want to leave most of that moisture in there. That's the secret to a super moist bread!
- Coconut Sugar: I just love the gentle, caramel-like sweetness that coconut sugar brings to this bread. It has a finer texture than brown sugar and dissolves beautifully into the batter. It's a simple swap that adds a little depth of flavor and feels a bit more wholesome, which I really appreciate in a recipe we enjoy for breakfast or snacks.
 Healthy
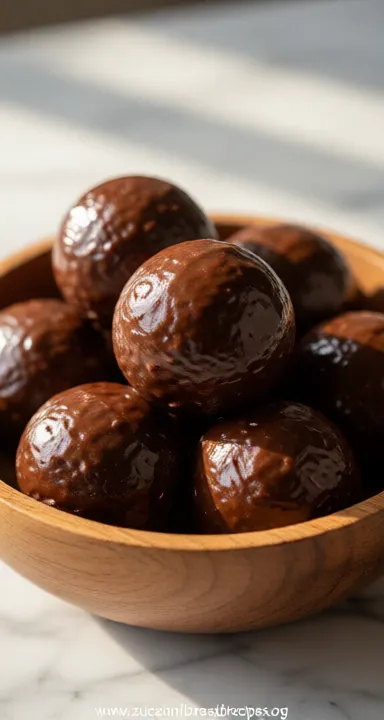
Energy Balls: Healthy Easy Snack Recipe
A calm, no‑bake snack that keeps you energized with wholesome nuts, dates, and a whisper of chocolate.
Complete Cooking Process
-
Preparation is a Gentle Start:
The first step is always about creating a calm space. I like to preheat the oven first, so the kitchen starts to warm up, and then I gather all my ingredients. It feels like a quiet ritual. Measuring the flours, spices, and sugars into their own bowls. Grating the zucchini is my favorite part; the fresh, green smell is so lovely. It’s these small, sensory moments that make baking feel less like a task and more like a mindful practice. This is the time to make sure your loaf pan is properly greased and floured (with GF flour, of course!) to ensure your beautiful bread releases perfectly later.
-
Mixing with a Light Hand:
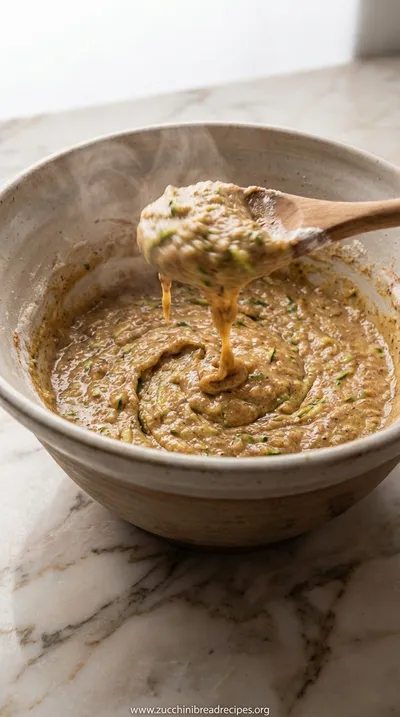
When it comes to gluten-free batters, the golden rule is to be gentle. You’ll whisk your dry ingredients together in one bowl and your wet ingredients in another. This ensures everything is evenly distributed before they meet. Then, you'll pour the wet into the dry and fold them together just until no dry streaks remain. It’s so important not to over-mix. Over-mixing can make the final bread tough or gummy. Once the batter is just combined, you’ll gently fold in the shredded zucchini. Look at those beautiful green flecks! The batter will be thick, but trust the process.
-
The Magic of Baking:
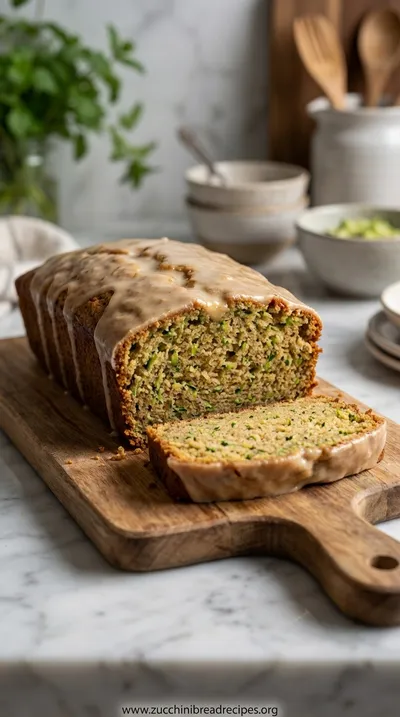
Now for the patient part. You'll pour that lovely, thick batter into your prepared loaf pan and smooth the top. Into the warm oven it goes. The next 50-60 minutes are when the transformation happens. Your kitchen will slowly fill with the most incredible aroma of warm spices and baked goodness. It's truly one of life's simple pleasures. When a wooden skewer inserted into the center comes out clean, it’s ready. Let it cool in the pan for a bit before turning it out onto a wire rack to cool completely. This step is crucial for the structure of the bread, so as tempting as it is, try to wait!
-
Don't skip the xanthan gum if your GF flour blend doesn't have it. It’s vital for texture.
-
Let the bread cool completely before slicing. Gluten-free breads need this time to set up properly.
-
Add a tablespoon of lemon juice or apple cider vinegar to the wet ingredients to help activate the baking soda for a better rise.
Pro Tips for a Perfect Loaf
These little details, I've found, are what take a good loaf and make it truly great. They're the whispers of experience passed down.
Frequently Asked Questions
→ Can I use a different gluten-free flour blend?
Yes, but with a little caution. Different gluten-free flour blends have varying ratios of flours and starches, which can affect the moisture and density of the bread. My recipe was tested with a standard 'cup-for-cup' or '1-to-1' baking blend that includes xanthan gum. If you use a different blend, you might need to slightly adjust the liquid. I'd suggest starting with the recipe as written and seeing how your batter looks; it should be thick but pourable.
→ Why did my zucchini bread turn out gummy or dense?
This is a common concern with gluten-free baking! Gummy texture usually points to one of two things: over-mixing the batter or under-baking the bread. When you over-mix, you can overwork the starches, leading to a dense result. Be sure to mix just until the ingredients are combined. Also, always, always do the toothpick test to check for doneness. If it doesn't come out clean, give it another 5-10 minutes. Every oven is a little different.
→ Can I make this recipe dairy-free?
Absolutely! This recipe is wonderful because it's naturally very close to being dairy-free. Since it uses oil instead of butter, you don't have to worry about that. If your gluten-free flour blend contains any dairy (which is rare, but good to check), just make sure to use one that is dairy-free. The recipe as written should be perfectly suitable for a dairy-free diet.
→ How should I store this bread and can I freeze it?
This bread stores beautifully. Once it's completely cooled, I wrap it tightly in plastic wrap or place it in an airtight container. It will stay wonderfully moist at room temperature for about 3-4 days. For freezing, I recommend slicing the loaf first. You can then wrap the individual slices and place them in a freezer-safe bag. They'll last for up to 3 months, and you can just pull one out to thaw whenever you need a little treat.
→ Do I need to peel the zucchini before grating it?
Oh, please don't! The peel is where so many of the nutrients are, and it's so tender that it bakes right into the bread without affecting the texture at all. All it does is add those lovely little green specks that let you know you're eating something with a bit of goodness inside. Just give the zucchini a good wash and trim the ends before you start grating.
→ Can I reduce the amount of sugar in this recipe?
You can, but keep in mind that sugar does more than just sweeten; it also contributes to the moist texture and browning of the bread. You could probably reduce the sugar by about 1/4 cup without a dramatic difference. For a more significant reduction, you might want to look into something like my keto-friendly version, which is designed to be low in sugar from the start.
→ Could I turn this recipe into muffins?
Yes, this batter works wonderfully for muffins! Simply divide the batter among a lined 12-cup muffin tin, filling each cup about three-quarters full. The baking time will be much shorter, around 20-25 minutes. Just keep an eye on them and use a toothpick to check for doneness. They're a great grab-and-go option. Speaking of muffins, if you like savory options, you might enjoy these zucchini cheese muffins.
Nutrition Facts
per serving
195
Calories
3g
Protein
27g
Carbs
9g
Fat
Taste Profile
A comforting, sweet loaf with warm notes of cinnamon and nutmeg and a subtle, earthy background from the zucchini.
Ingredient Substitutions
Don't have an ingredient? Try these alternatives
You can easily substitute an equal amount of packed light brown sugar. If using maple syrup, use about 3/4 cup and you may need to reduce the oil by a tablespoon to maintain the right batter consistency.
Any neutral-flavored oil will work beautifully here. Melted and slightly cooled coconut oil adds a very subtle coconut flavor that is quite lovely. Canola or sunflower oil are also great options.
For a vegan version, you can try using two flax eggs. To make one, mix 1 tablespoon of ground flaxseed with 3 tablespoons of water and let it sit for 10 minutes to thicken. The texture may be slightly denser, but still delicious.
Recipe Variations
Try these delicious twists on the original
Chocolate Chip Zucchini Bread
For a sweeter treat, fold in 3/4 cup of your favorite semi-sweet or dark chocolate chips into the batter at the end. The melted chocolate pockets are just heavenly. For a similar vibe, you might also like these chocolate zucchini muffins.
Cranberry Orange Zucchini Bread
Add the zest of one orange to the wet ingredients and fold in 1/2 cup of dried cranberries with the zucchini. This variation is bright, festive, and perfect for the holidays. For a more detailed recipe, check out this Orange Cranberry version.
Carrot and Apple Zucchini Bread
Create a garden harvest loaf by substituting half of the zucchini with finely grated carrot and apple. This combination adds extra moisture and a lovely, complex sweetness. For a similar idea, you should try my Carrot Apple Zucchini Bread recipe.
Common Mistakes to Avoid
Learn from others' mistakes for perfect results
- Slicing the bread while it's still warm. Gluten-free breads are delicate and need to cool completely to set their structure. Slicing too soon will lead to a crumbly, gummy mess.
- Packing the flour into the measuring cup. This adds too much flour and will result in a dry, dense bread. Always spoon and level for accuracy.
- Aggressively squeezing all the water out of the zucchini. That moisture is your best friend for a tender crumb. A gentle press to remove excess dripping water is all that's needed.
- Forgetting to check if your GF flour blend contains xanthan gum. If it doesn't, and you don't add any, your bread will be very crumbly and won't hold together well.
Meal Prep & Storage
Make Ahead Tips
This recipe is perfect for making ahead. You can bake the entire loaf a day or two in advance; in fact, I think the flavor deepens and the texture gets even better on the second day. Just be sure to store it well-wrapped at room temperature. You can also mix your dry ingredients together and store them in an airtight container for several weeks, which makes the process even quicker when you're ready to bake.
Leftover Ideas
Leftover slices are a true gift! They are fantastic gently toasted the next morning and slathered with butter. You can also crumble a slice over a bowl of yogurt with some fresh fruit for a delicious breakfast parfait. For a more decadent treat, you can even use slices to make a gluten-free bread pudding or French toast. The possibilities are surprisingly endless for this humble loaf.
Perfect Pairings
Serve this with...
Cooking Timeline
Preheat oven and prepare loaf pan. Grate zucchini and set aside. Whisk together all dry ingredients in a medium bowl.
In a large bowl, whisk together all wet ingredients (eggs, oil, sugar, vanilla). Gently fold in the shredded zucchini.
Pour the dry ingredients into the wet and fold gently with a spatula until just combined. Pour batter into the prepared loaf pan.
Bake for 55-65 minutes, until a skewer comes out clean. Let cool in the pan for 15 minutes before transferring to a wire rack.
Allow the loaf to cool completely on the wire rack before slicing and serving. This can take up to 2 hours.
 Healthy
High Protein Cookie Dough
Delicious, chocolatey cookie dough packed with protein for a healthy on‑the‑go treat.
Simple Gluten-Free Zucchini Bread Recipe
Easy gluten-free zucchini bread that's moist and delicious. Perfect healthy snack or breakfast with simple ingredients.
Timing
Prep Time
20 Minutes
Cook Time
60 Minutes
Total Time
1 Hour 20 Minutes
Recipe Details
Ingredients
Dry Ingredients
-
01
2 cups gluten-free all-purpose baking flour (with xanthan gum)
-
02
1 teaspoon baking soda
-
03
1/2 teaspoon baking powder
-
04
1 teaspoon ground cinnamon
-
05
1/2 teaspoon ground nutmeg
-
06
1/2 teaspoon salt
Wet Ingredients
-
01
2 large eggs, at room temperature
-
02
1/2 cup avocado oil or other neutral oil
-
03
1 cup coconut sugar or packed brown sugar
-
04
1 teaspoon vanilla extract
-
05
1 1/2 cups packed shredded zucchini (about 1 medium zucchini)
Instructions
First, let's create our calm space. Preheat your oven to 350°F (175°C) and gently grease a 9x5-inch loaf pan. I like to dust it with a bit of gluten-free flour too, just to be sure nothing sticks. In a medium bowl, whisk together all your dry ingredients: the gluten-free flour, baking soda, baking powder, cinnamon, nutmeg, and salt. Whisking them well now ensures that all those lovely spices and leavening agents are perfectly distributed, so you get a consistent, even bake. Set this bowl aside for a moment.
Now for the wet ingredients. In a separate large bowl, whisk the eggs until they are light and fluffy. This adds a little air to the batter. Then, pour in the oil, coconut sugar, and vanilla extract. Keep whisking until everything is smooth and well combined. Next, it's time for the star ingredient. Gently fold in the shredded zucchini. Remember, just a gentle squeeze to remove the dripping water, not all of it. The batter will look beautifully flecked with green.
It's time to bring everything together. Pour the dry ingredient mixture into the wet ingredient mixture. Using a spatula, fold the ingredients together gently. You want to mix only until you no longer see any dry streaks of flour. Remember, being gentle is key here to avoid a dense loaf. The final batter will be quite thick, and that's exactly what you're looking for. It's this thick, luscious batter that bakes up into such a wonderfully moist bread.
Carefully pour the batter into your prepared loaf pan, using your spatula to spread it evenly to the corners. Place the pan on the center rack of your preheated oven. Now, let the oven do its magic for 55 to 65 minutes. The top will turn a gorgeous golden brown and a wooden skewer inserted into the center should come out clean. Once it's done, let the loaf cool in the pan on a wire rack for about 15 minutes before gently turning it out to cool completely. Patience during this cooling stage is so important for the perfect slice!
Notes & Tips
-
1
For the best texture, make sure your eggs are at room temperature. This helps them incorporate more smoothly into the batter, creating a lighter crumb.
-
2
Feel free to add about 1/2 cup of chopped walnuts, pecans, or chocolate chips to the batter for extra texture and flavor. Just fold them in gently at the very end.
-
3
If the top of your bread starts to brown too quickly before the center is cooked, you can lightly tent a piece of aluminum foil over it for the last 15-20 minutes of baking.
 Classic
Orange Juice Cake – Moist, Citrus Delight
A moist orange juice cake that’s light, citrus‑perfumed, and perfect for any gathering.
Tools You'll Need
-
9x5-inch Loaf Pan: A sturdy, light-colored metal loaf pan is my preference. It conducts heat evenly, giving the bread a lovely golden crust all around. A glass or dark metal pan will work, but you may need to adjust your baking time slightly as they retain heat differently.
-
Box Grater: Honestly, a simple box grater is the best tool for shredding zucchini for this bread. The medium-sized holes create perfect little shreds that melt into the bread while still providing moisture. It's a bit of an arm workout, but the texture is worth it.
-
Mixing Bowls: You’ll need at least two: one for the dry ingredients and a larger one for the wet. I love using glass bowls because I can see everything mixing together from all angles, ensuring there are no hidden pockets of flour.
-
Wire Cooling Rack: This is non-negotiable for me. Allowing the bread to cool completely on a wire rack lets air circulate all around it. This prevents the bottom from getting soggy and ensures the internal structure of the bread sets up perfectly for slicing.
Must-Know Tips
-
Measure Flour Correctly: For gluten-free flour, I always recommend the spoon-and-level method. Spoon the flour into your measuring cup, then level off the top with a straight edge. This prevents a dense, heavy loaf.
-
Don't Over-Squeeze Zucchini: A gentle squeeze to remove dripping water is enough. Leaving some moisture in the zucchini is the secret to a moist bread. Squeezing it completely dry will result in a drier loaf.
-
Let It Cool Completely: I know it's so tempting to slice into it while it's warm, but gluten-free baked goods need time to cool and set. Slicing too early can result in a gummy texture. Patience is a virtue here!
Professional Secrets
-
A Touch of Acidity: Adding a teaspoon of apple cider vinegar or lemon juice to the wet ingredients can give the baking soda a little boost, resulting in a better rise and a more tender crumb. It’s a subtle trick that makes a difference.
-
Rest the Batter: If you have an extra 15 minutes, let the batter rest in the bowl after mixing. This allows the gluten-free flours to fully absorb the liquid, which can improve the overall texture and moisture of the bread.
-
Bang the Pan: Before placing it in the oven, give the filled loaf pan a few gentle taps on the counter. This helps release any large air bubbles and ensures a more even, uniform crumb inside your finished loaf.

Recipe by
Maya Green🌱🥗 Healthy foodie, vegan baker, and smoothie lover. Sharing guilt-free treats with energy and love 💪💚.
Get Delicious Recipes Weekly
Join 25,000+ home cooks getting our best recipes straight to their inbox.
Free forever • No spam • Unsubscribe anytime